If you want to save money on your studio but your acoustics are less than stellar, consider building your own skyline diffusers. A wooden diffuser can make your room sound bigger and more open and it looks good at the same time. If you are into DIY you will have fun building it because it can be personalised to your wishes. A DIY-Diffuser will come realtively cheap, and while wood can be expensive a 60×60 diffuser should not run your more than 50 Euros ($60) in material costs.
The perfect acoustics are archieved by a combination of both absorption and diffusion in the room. A diffuser will reflect and scatter soundwaves, especially high frquencies, to create a more open soundstage. To take care of absorbtion you can buy pyramid foam and bass traps and stick them on to your walls, or even build your own. A single skyline diffuser in the right spot can make a subtle but still noticable difference, but the larger the diffuser and the more diffusers you are using in the right place, the more impact they will have on your acoustics.
Material and Planing
In theory you can use any material that is hard and dense enough to reflect soundwaves. Even styrofoam is used every now and then in low-cost projects. Wood has been used traditionally because it is easy to build with, robust and has great acoustic properties. A wooden diffuser will naturally absorb very high frequencies to a small degree. If you have ever been inside a wooden church, you probably know the warm acoustic environment wood can naturally create. But to introduce that dry sound-signature into your room, you would have to build quite a few of these.
Start off planing your diffuser by deciding how big it should be and where you are going to place it. Just as easily as the skyline diffuser you could also build a so-called one-dimensional diffuser, which scatters sound waves on one axis instead of two. The reason I am focusing on skyline diffuser in this blogpost, is because they have proven to be more effective in theory and in my personal experience than one-dimensional diffusers. They also don’t produce spikes in frequency response when recurring patterns are used amongst larger areas. They are just as easy to build and also look quite nice, but they might be a bit heavier, which is the only downside I can think of.
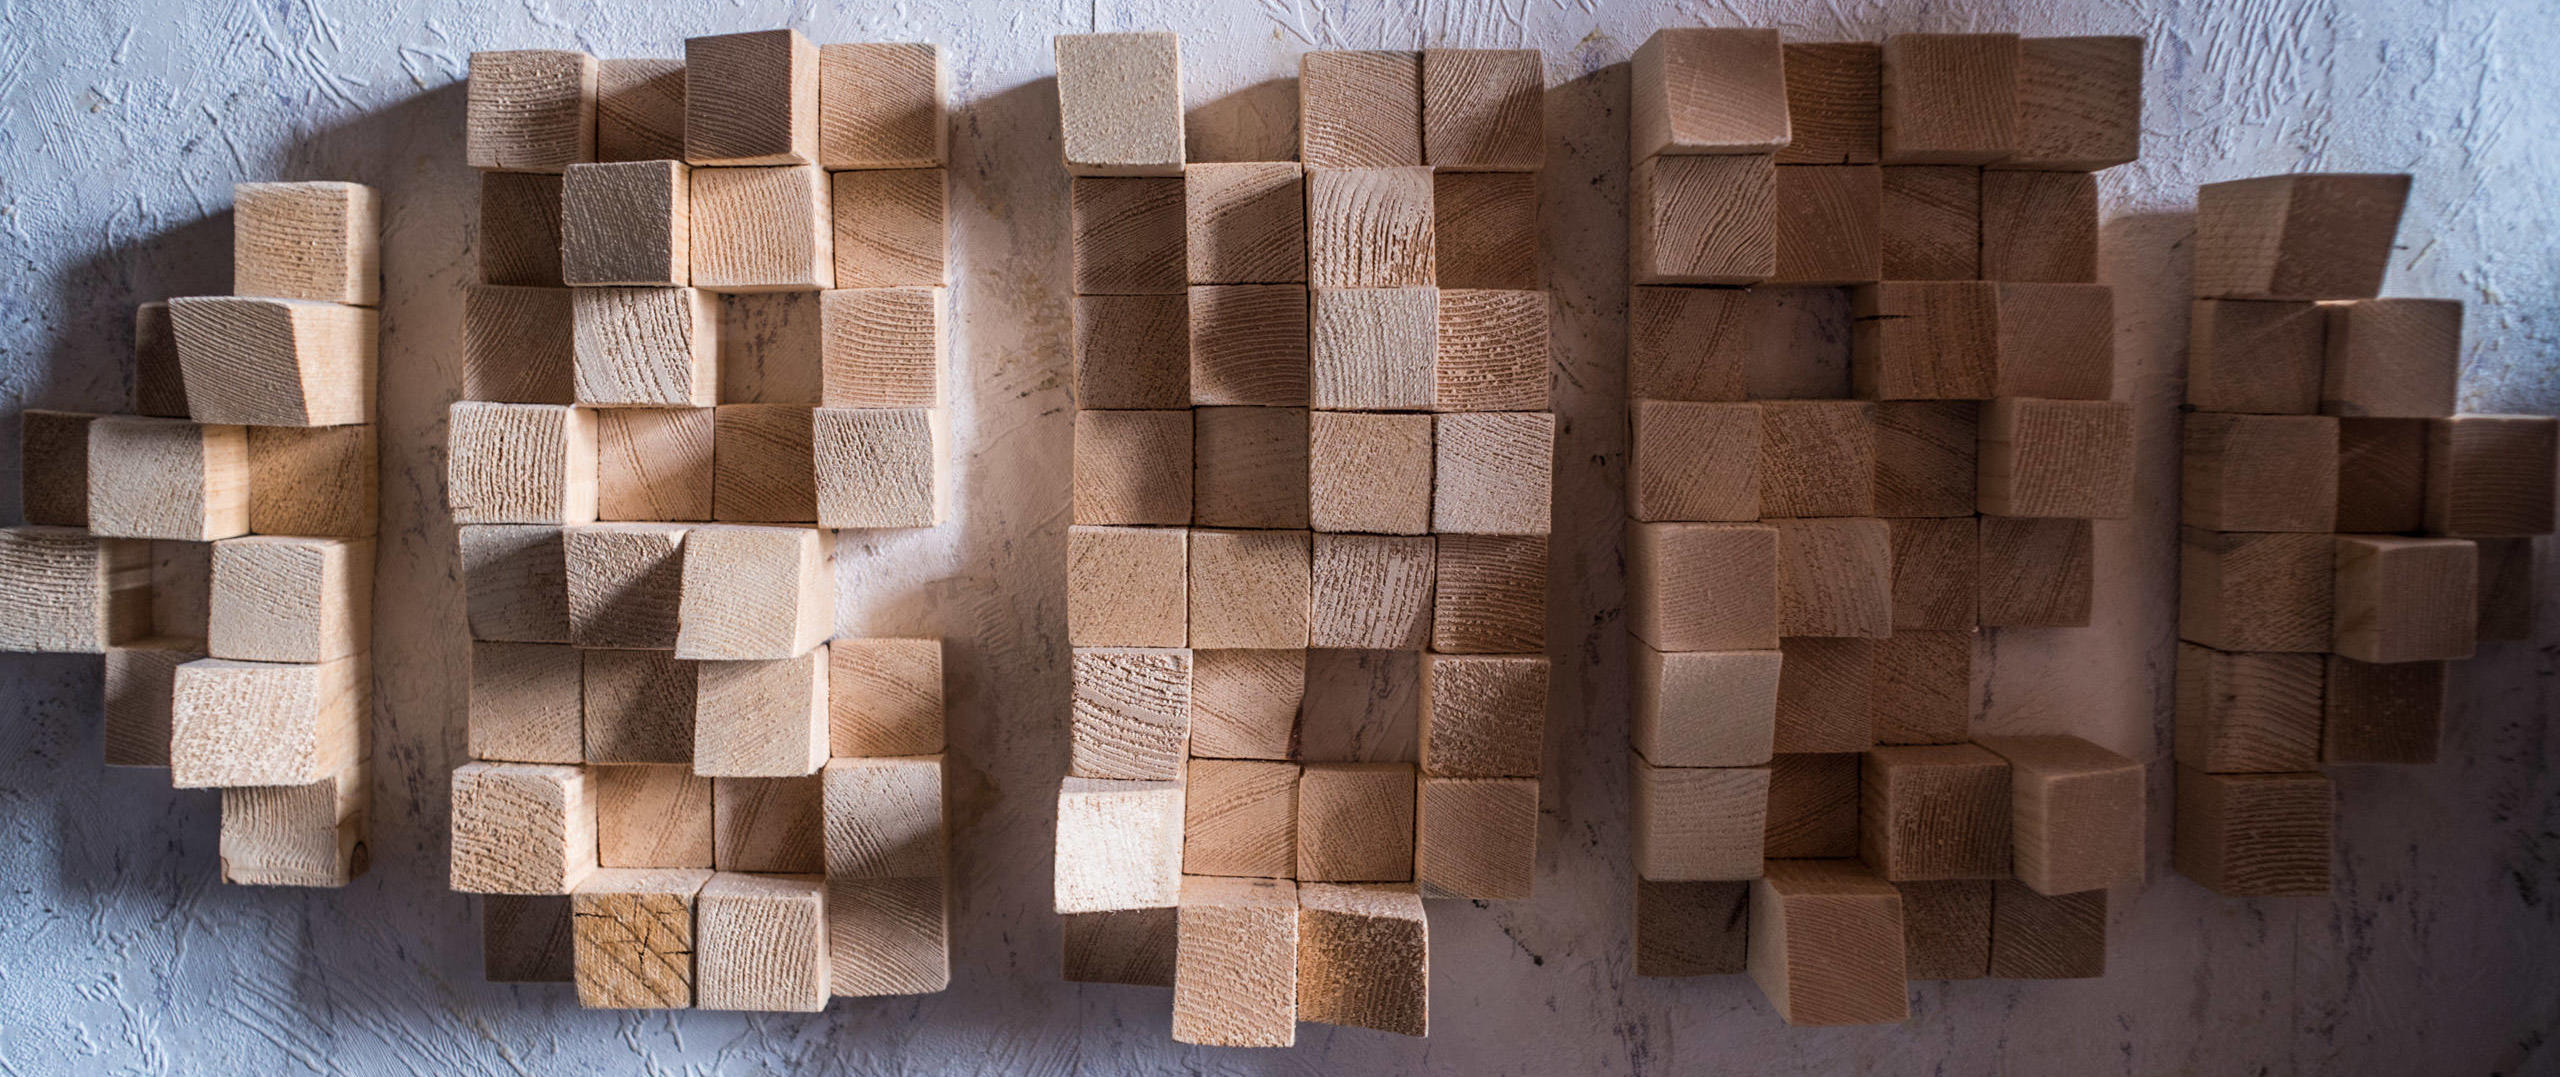
A skyline diffuser is basically an approximation to a smooth 3-dimensional surface using a certain number of building blocks. The dimensions of those blocks will determine the frequency range in which your diffuser is active. The longer your blocks are, meaning the further your diffuser is gonna stick out from the wall, the lower the frequency it can diffuse effectively. On the other hand the thinner your blocks are, meaning the more blocks you’re going to need to build the same size diffuser, the higher the frequency your diffuser reaches up to. Generally the width of your blocks should be rather narrow in relation to the depth. A rather flat diffuser design might look nice but will not be as effective as a deeper one.
Skyline Diffuser Without a Backplate
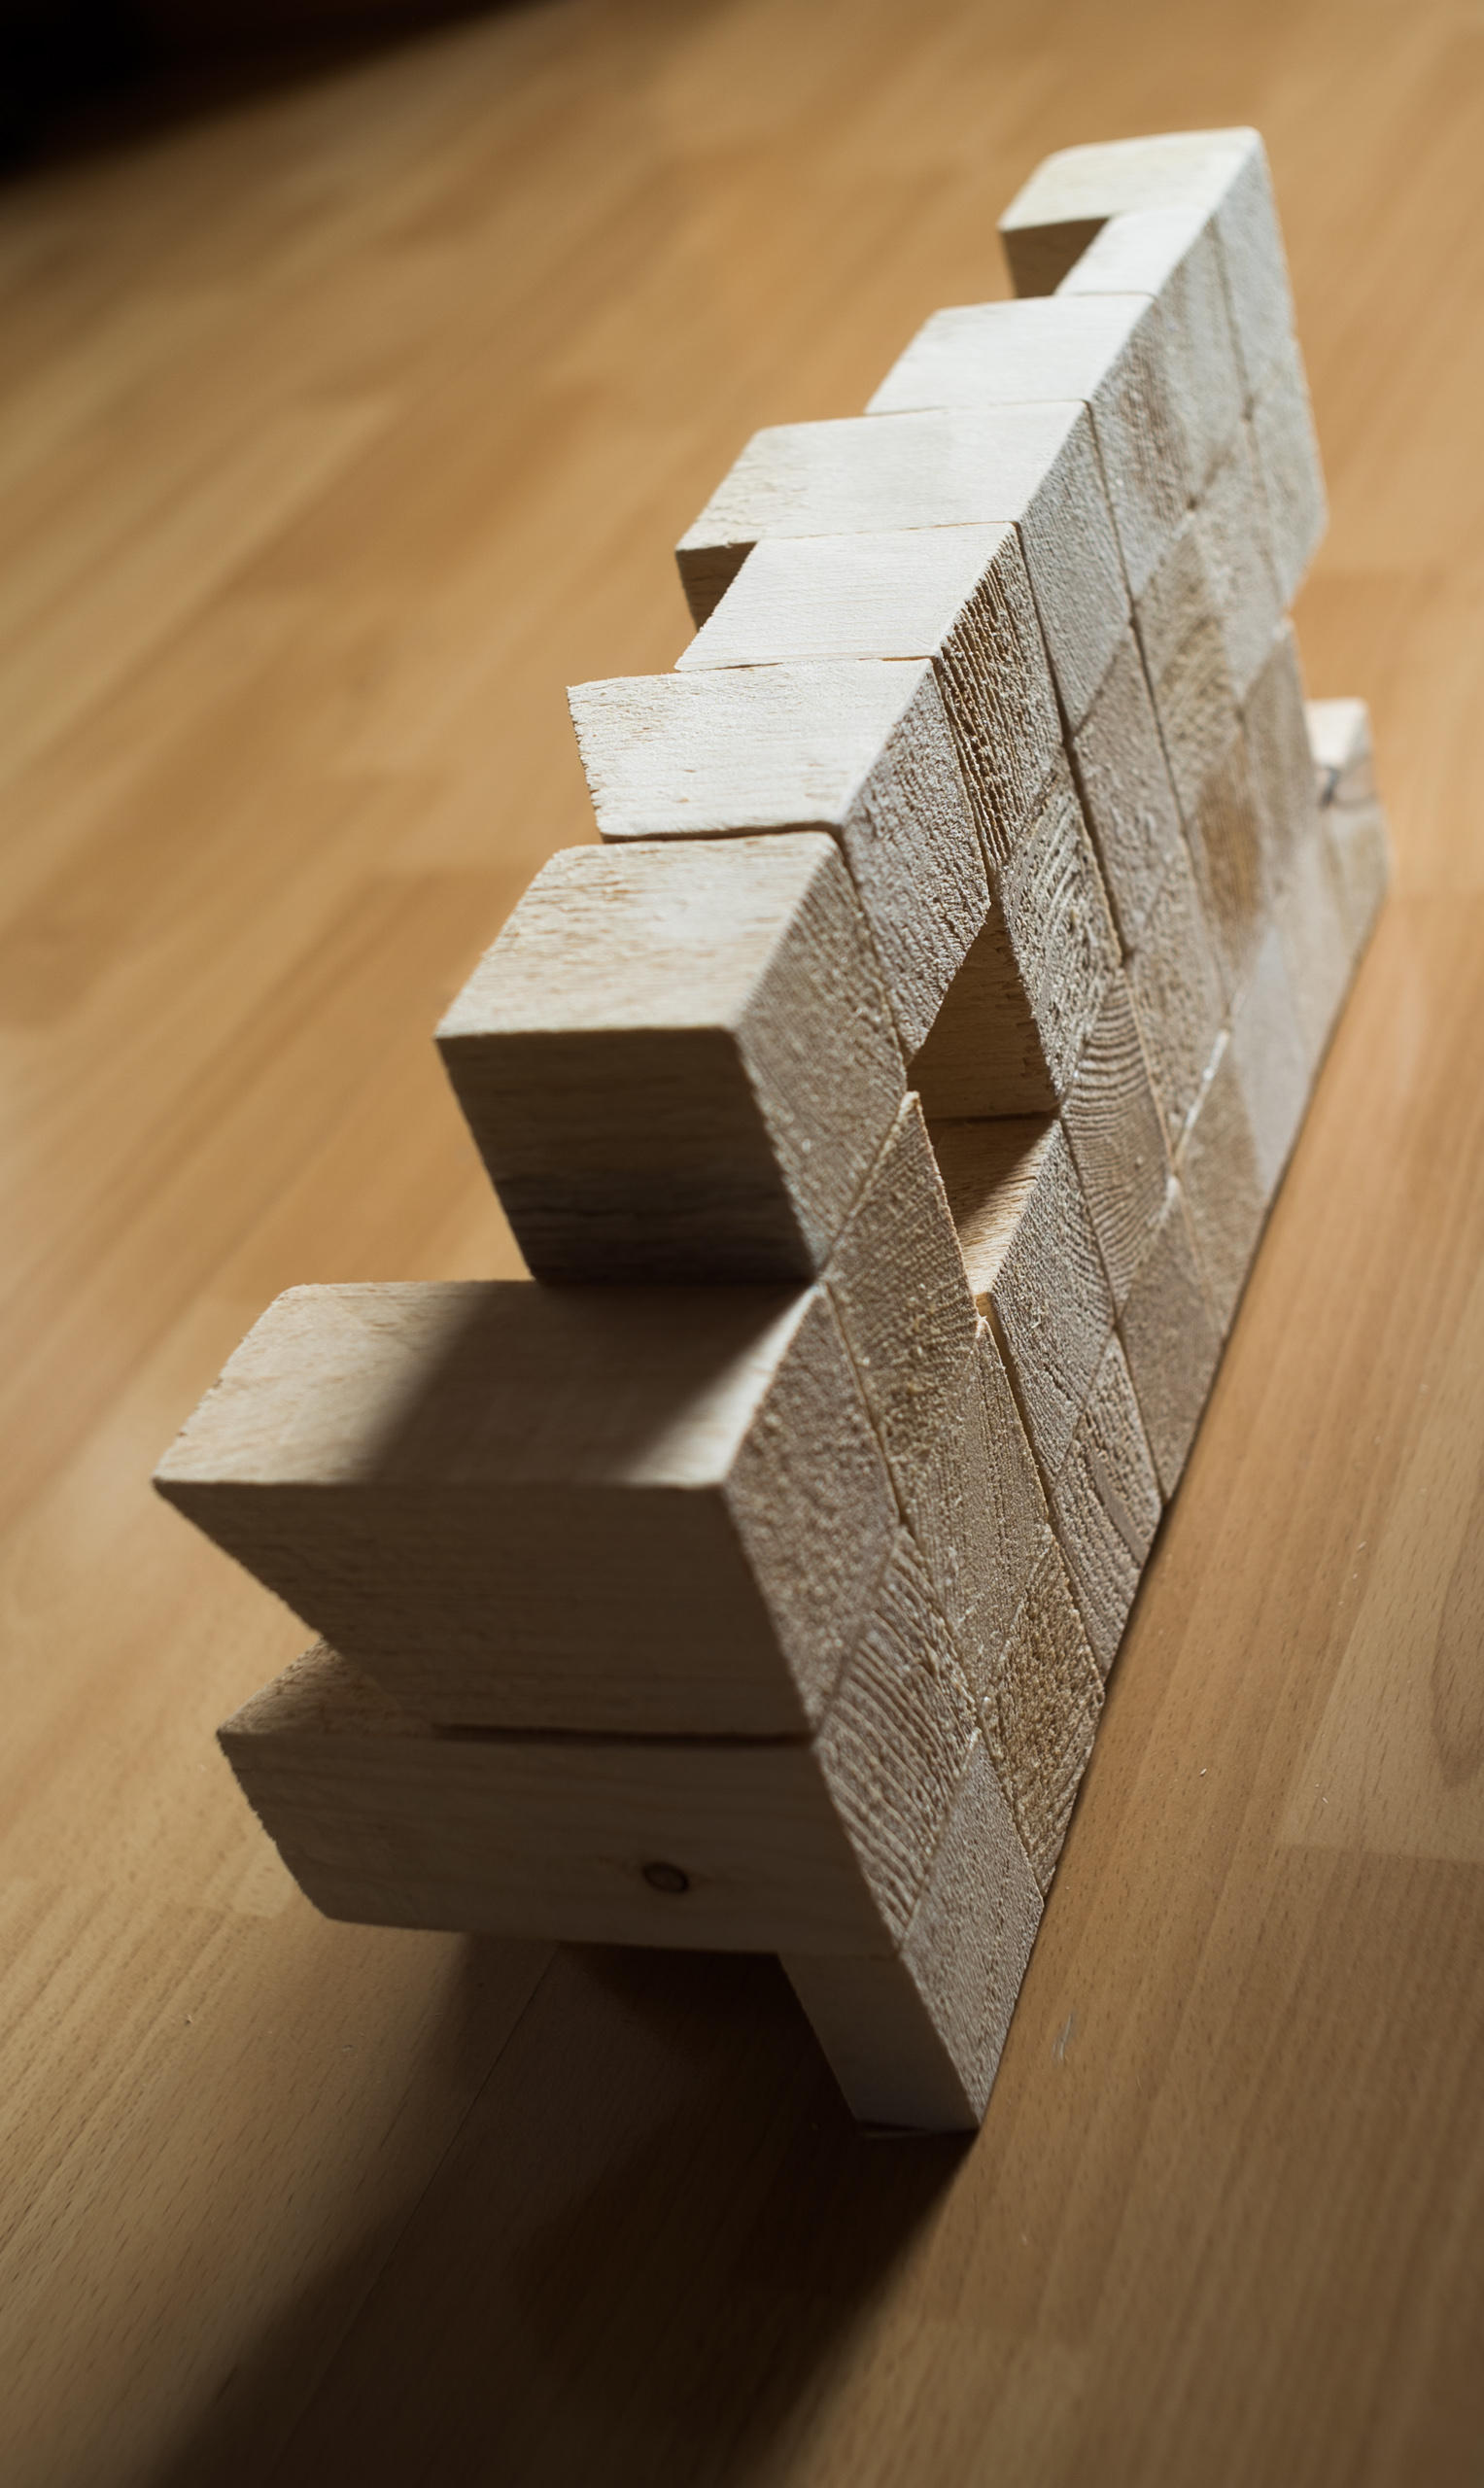
There are two variants of DIY skyline diffusers I have built so far. One where the blocks are glued onto a thin wooden backplate, and one where the blocks are glued directly together without any additional support. While using a backplate is mostly recommended and makes building a little bit easier, I have not discovered any real advantages. The diffuser modules I have built without a backplate however, are lighter and don’t stick out from the walls as much while retaining the same effect.
To build a diffuser without a backplate you should use a plain wooden plate where you can set up and align all your pieces according to the skyline diffuser pattern. Use wood glue to glue the pieces to each other but don’t glue them onto the plate. Once the glue has dried, turn the diffuser upside down and work on the backside with a rough sandpaper to make it even.
The Mathematics
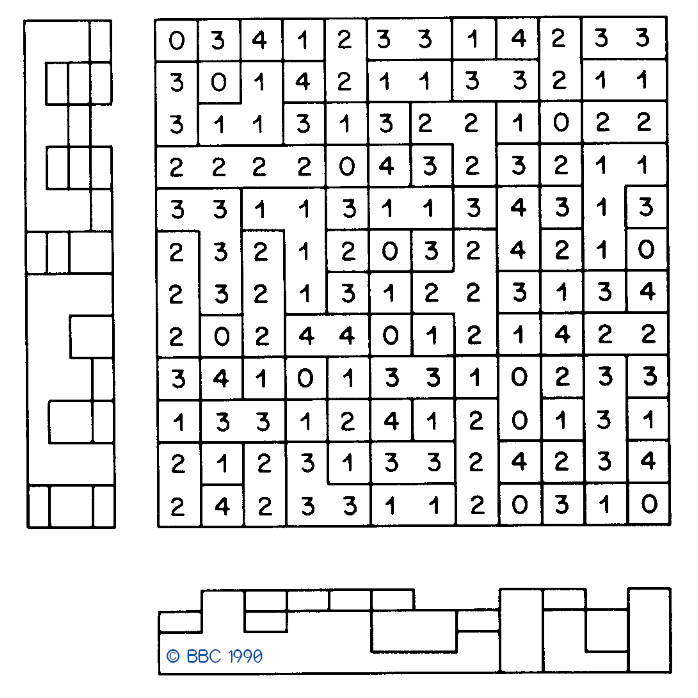
The picture on the left shows you the standard 12×12 arrangement of a skyline diffusor with number 4 representing the longest blocks and 0 representing gaps. Make no mistake, this pattern has been approximated using mathematic formulas and is not random, meaning for the sake of effectiveness you should not alternate it.
The four different block sizes are devided equally, meaning if your total diffuser depth is 10cm, your blocks will have the following lenghts:
► 4: 10cm ► 3: 7.5cm ► 2: 5cm ► 1: 2.5cm
In order to build a 12×12 diffuser pattern like the one on the picture, you will need 38 size 1 pieces, 38 size 2, 40 size 3 and 15 size 4 pieces. That’s 144 in total, at 10 centimeters depth that amounts to 7,35 meters of wood!
At 10cm depth, your diffusers low-cutoff frequency will be around 1700Hz. To go all the way to 1kHz your diffuser would already have to be 17 centimeters deep! The high cuttof-frequency of your diffuser will be determined by the width of your blocks. 5x5cm wood will give you a high cutoff around 3500Hz, 4x4cm gives you 4300Hz, 3x3cm gives you 5750 and 2×2 will give you 8600Hz. Keep in mind that the smaller your blocks, the higher your cutoff frequency, but the more blocks you will need to build the same size diffuser. Be considerate when planing, as the number of blocks can increase considerably when going for wider frequency bands. The golden middle in my opinion, is to start with 10cm depth and 4x4cm blocks, which will give you the most effective range somewhere between 1.7 and 4.3kHz. A single unit diffuser with 144 4x4cm blocks will measure 48×48 centimeters.
Design Choices

In terms of designing your diffuser there are no limits to your imagination – which is the beauty of it. You can experiment with different types of wood or completely different materials. Unlike absorbers, you can paint your diffusers with all types of colors without having to worry about deminishing it’s acoustic properties. You could paint the single blocks in different colors before assembling, creating a special type of pattern, or simply spray-paint the entire diffuser once it’s done.
The diffusor on the left ist a small 40x40cm diffuser I have built using 3×3 centimeter blocks with up to 11.5cm lenght. After assembling it I’ve used an angle grinder to cut the line design on the top and clear coated it.
As you can see in the pictures, I chose to cut certain blocks at an angle. While there is no mathematical evidence that suggest that this makes sense, it seemed to be a cool idea design-wise and I did it in the hopes of further increasing diffusion at steep angles.